Friday, December 12, 2014

E-10 Five & Dime

I am posting 3 blocks today that all have the same applique technique. Remember, these are simple techniques the way I am doing my blocks. There are lots more ideas on the "that quilt" blog. The link is on the sidebar.
This block is the same as the previous block  A-7
Make a simple  4-patch block by cutting two 3 inch green squares and two 3 inch white squares and sewing them together.
This block had only 2 coloured melons so was easier to place.


It really does look straighter sitting here beside me.
Blessings,
Chris

A-7 Dad's Plaids


I started by making a simple 4-patch block by cutting
two 3 inch blocks of white background and
two 3 inch blocks of focus fabric.

I traced the melons from the book and made sure they were a bit smaller so they would fit into the square without coming too close to the corners.
Actually, I cut the wash-away fusable floriani using one of my GO custiom leaf dies. This way, I cut out enough for 3 blocks.
Using the purple Elmer's school glue, I first folded in the points.
 The purple really does disappear.
 Glued down one side.
Then the other side making sure that I got a nice sharp point.
I got some new steel applique gadgets at the AQS back in the summer and am still trying to figure them out. I used my fingers more than the rods.
I am still working on it.  


Using a matching white thread, I took a tiny stitch through each of the center points of the melons in the order I wanted them to be positioned when finished.


Then pulled the threads together so the points all came to the center neatly.
Still working on the neatly.


When I was happy, I glue basted the
melons in place. Then waited for it to dry.


And finally, machine appliqued them in place using a simple straight stitch in matching thread.
I will square it up to 5 inches.


The end.

Blessings,
Chris

E-1 Aunt Exie's Phox

After much deliberation and procrastination, I finally decided to machine applique the melons with a simple straight stitch in matching thread.  I traced the melon shape onto the floriani making sure it was a tad smaller so it would fit into the block corners. I turned the seam allowance under and glued it with the purple Elmer's.
This next step I found on a blog somewhere last year and thought it ingenious. Using a matching coloured thread, I took a tiny stitch through each of the inside melon points in the exact order I wanted them to lie in the center of the block. I am using the same coloured thread as the piece I am stitching down so it is already in place and ready to stitch away.


Pulled the threads together, but not too tight.


Then arranged them neatly in the center. The white thread did not show up in the fabric so I used a black background.


E-1 
Now the melons are centered on the 5" square and glue basted in place after centering. I initially hand appliqued this block but found it a bit stressful pushing the needle through the fabric. SO, I decided to machine applique after all in matching thread. The square above is the correct colour. 


I am still not too sure about the wash-away effect promised with this floriani stuff. It feels a bit stiff right now, but I am committed.

Blessings,
Chris


Thursday, December 4, 2014

G-5 Poof


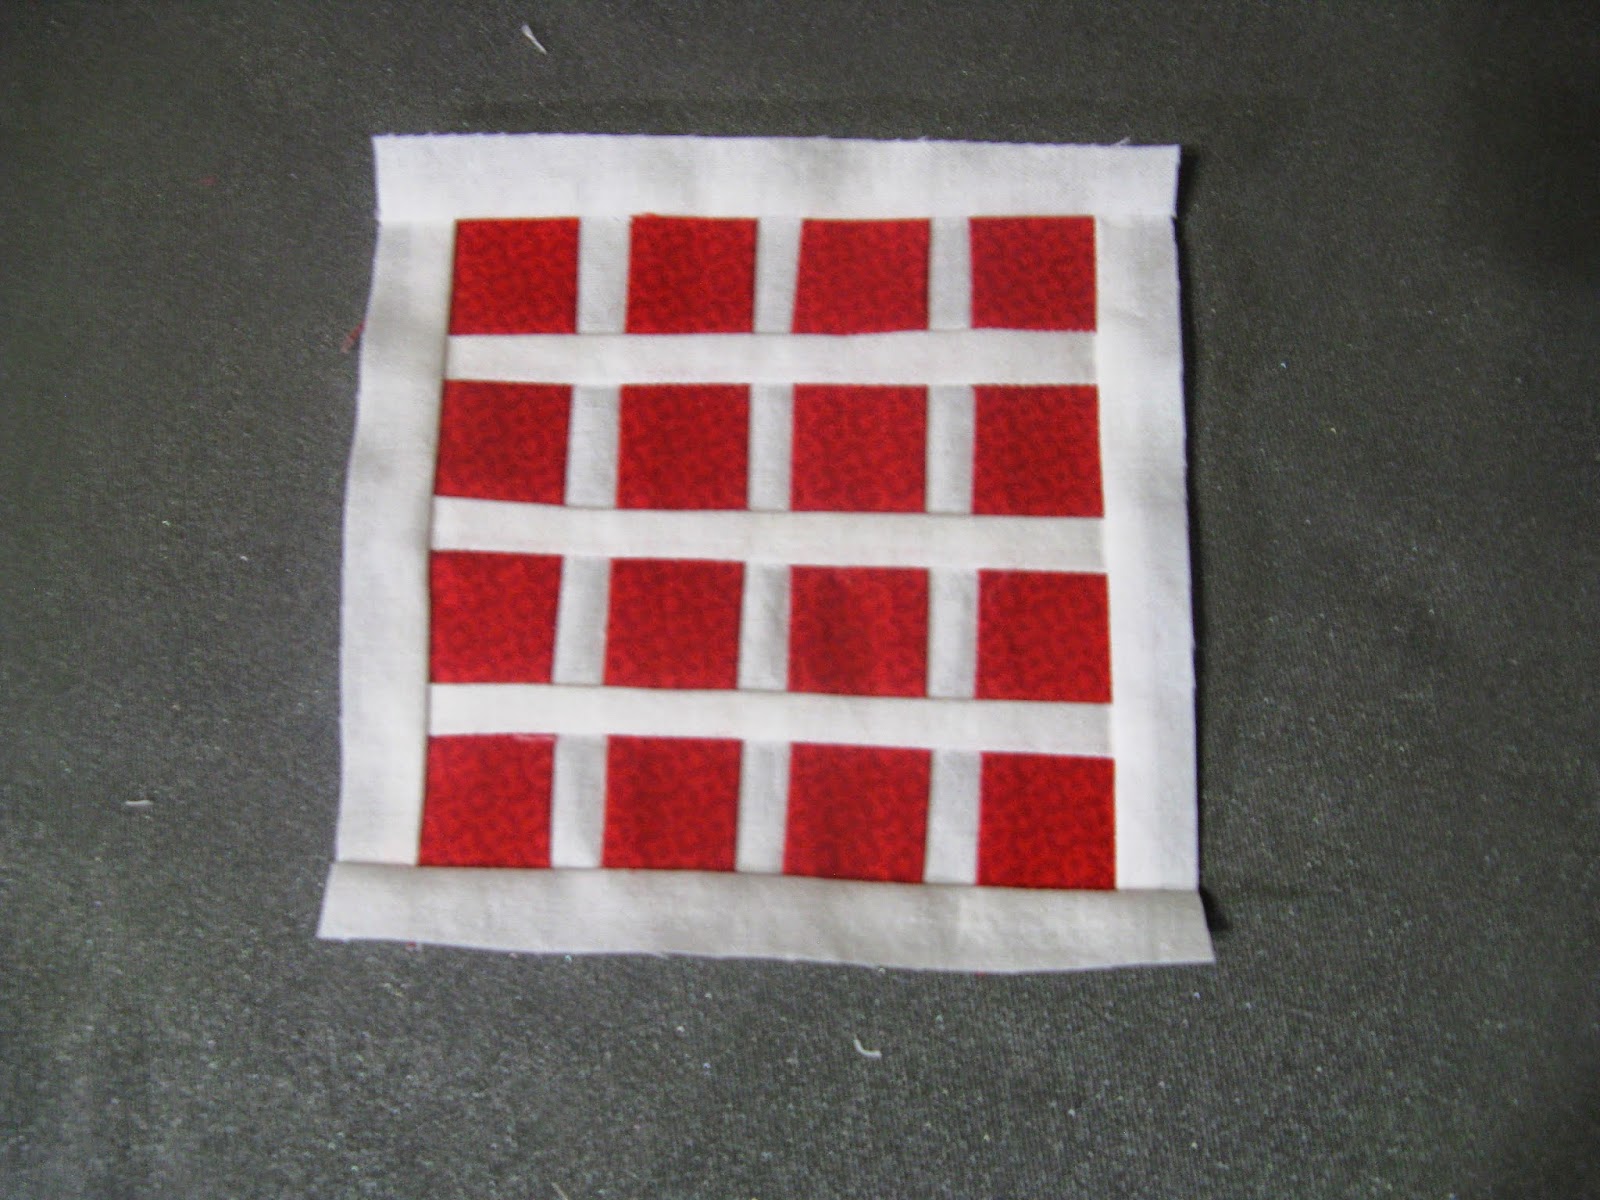
This block is the same technique as the previous one H-13 with the exception that the white strips through the center finish at 3/8".

Believe it or not, I did this one wrong the first time also.

Cut the  coloured square 5 1/2"
then cut diagonally both ways.
Cut the cross strips 7/8" wide.
Cut 2 cross strips 3 1/2" long.
Cut 1 cross strip 7" long.


Sew together as shown.
I pressed to the dark. There is not enough room inside the back of the cross strip for both seams.


This quilt is a perfect place to try a lot of new techniques because each block is small and different. The sky is the limit for trying new things. 

For this block, I traced the center design onto wash-away fusable web. I ironed the cut-out to the back of the background fabric and cut out leaving a scant 1/4" seam allowance.
Cut to the point at those 4 inny curves. 
Then centering the patch onto the prepared block, I glue basted it in place. You can see that the center X shows through the patch on top even with the fusable web. I think I might have to trim away the backing in the center.


I needle turned the edges under using my favourite #10 milliners needle.


Interesting how lighting can make such a difference in how the colour shows. I took these pictures at 3 different times this past month.
The background fabric is a Kona white that I got as a pre-cut from Craftsy. Even with the white wash-away fusable inside, you can see right through it, although it is not a really thin fabric.


So, what I have decided, now after stitching a few of these by hand, is that I will be doing them by machine applique. I prefer the needle gliding through the fabric and not being pushed through. That is a bit stressful on my hands.

Blessings,
Chris

Monday, December 1, 2014

H-13 Farm Fields

Don't let the simplicity of this block fool you. I did it wrong the first time for both quilts by cutting the square a bit too small.

The DJ software says to cut the focus fabric 5" square. I recommend cutting it 5 1/4" or even 5 1/2".
Brenda says to "make it big and whack it off."
Cut the square diagonally both ways to  look like this.


Using the pattern in the book, measure the width of the white stripes and add 1/4" on both sides for seam allowances.
I used the 1" pre-cut strips for this.

Cut 2 shorter strips 3 1/2 long.
Sew together to opposite triangles.
Press to the dark.
Cut a longer strip 7".


Sew to one triangle than the other.
Press to the dark.
Trim to a 5" square.


Blessings,
Chris

Tuesday, November 18, 2014

Welcome to my Dear Jane 2 Blog


This is a new blog I recently started to chronicle my journey making my second Dear Jane Quilt.

Dear Jane Quilt in Civil War reproduction fabrics - started Oct 2009 completed Sept 2014

Here you will find a post for every one of the 169 four and half inch blocks and 52 triangles and 4 corner kites. I will not be posting them in order, but rather by technique. Each block will have its own post and will be found in order on the right side bar. Anyone can follow along to make it, but really should have their own book. Its a copyright thing.

I started with the easiest pieced blocks. These can be made by simply measuring the pattern in the book and adding 1/4 inch seam allowance all around. I will be showing brief tutorials for several different applique techniques. The tutorials are not meant to be exhaustive, but rather the way I am making mine. I do make mistakes, so don't hesitate to tell me so I can correct it here. I am using the Dear Jane software for the foundation piecing and printing the patterns.

Bright Jane

It was a very hard decision to finally settle on just 1 new colour scheme for this quilt, since there are so many versions out there in cyberspace to see and drool over. I am using bright colours on a crisp Kona white background. I have not yet decided if I will be framing it in black or white. There is something about the crispness of the colour on white that I like. And there is something about the brazenness of the bright colours on the black. My now 7 year old granddaughter designed the layout on EQ7 and the Dear Jane software that she has been playing on for about 3 years. Since before she could read, she has been doing things of computer and colouring and saving. I think I will ask her advise after I have a few more completed.


DJ2 Applique Blocks

These are the applique blocks I am working on this month. Do I want to hand applique them or machine applique? Any thoughts? I have matching bright thread.Or should I use contrasting thread and showcase the applique?

Blessings,
Chris


Friday, November 14, 2014

J-6 Granny Weaver


This block uses a combination of techniques that have already been used in M-12 and J-7.


Cut 1 strip focus fabric 9.5 x 1 inch.
Cut 2 strips background 9.5 x 1 inch.
Sew together.


I cut these into 4 squares that are 2 inches square.
Then cut 1 piece that is 1 inch wide.
This last piece is for the center 9-patch.


At the far right are 2 units that I made by cutting 2 red strips 1" x 2"
and 1 white strip 1" x 2"
sewn together then cut into half.
I laid out the small bits to make a tiny 9-patch.
These measure 2" x 2" for the center of the block.
I cut 4 red squares 2" x 2" for the corners.


I laid out all the squares like this
then sewed them together and pressed.
And this is what I got.


Blessings,
Chris

Thursday, November 13, 2014

C-12 Family Reunion

                                                           
One of the joys of blogging is formatting. I cannot figure out some days how to get the formatting the way I want it. But this works for now.     C-12 uses the same  construction technique as J-7. The DJ software says to cut 25  one inch patches of focus fabric and 20 one inch patches of background. Then cut 4 background squares that are 2 inches square.       

I cut long strips like this that were
1 inch wide. 
Lay out one set of strips with the background in the center and another with 2 background on the outside like this.
Sew together and press to the dark.

I was working on 4 blocks at a time the other day and did not take as many pictures as I could have.


Cut 1 inch strips of each of the above and lay out like this to make the 9-patch units. Sew together.


This block is a tiny double 9-patch. 

Blessings,
Chris


Wednesday, November 12, 2014

K-2 Grampa's Chickens

The DJ software gives directions to cut 18 patches focus fabric (ff)
1 1/8"  x 1 1/8". 
(wish my computer did the fractions properly)
.

Cut focus fabric 25" x 1 1/8", or
I cut 2 strips that were 9. 5" x 1 1/8"
and 1 that was 6" x 1 1/8".
I am using fat 1/8ths and they are 9.5" wide.


I like to cut the strips along the straight of grain and not the cross grain since the cross grain will stretch when the long strips are sewn together.


Sew together and press to the dark.
Now cut 1 1/8".
There should be 18 total.
Now it is really really important to have the same pair on the top when sewing together or they will not line up at the end.
I started with white on top and blue below.

All sewn together it looks like this.
When will I learn to shut off the steam on the iron?
That wavy side is a result of steam stretching the edge.
Since I sewed the first seam on the straight of grain. all those outside edges are cross grain and stretch easily. 


Sew 1" coping strips around the outside log cabin style and then trim to
5".


Blessings,
Chris


Tuesday, November 11, 2014

E-9 Quilt Jail


The Dear Jane software gives instructions for this block to cut 16 patches 1 1/4" x 1 1/4".
and 12 patches 3/4" x 1 1/4".

I cut 4 red strips 1 1/4" x 6".
and 3 white strips 3/4" x 6".
I wanted to make sure there was a bit extra for straightening the cut. I got caught short with one of the earlier blocks and had to cut some more strips.

I sewed the white strips to the red and then joined them all together pressing to the red.
I forgot to take a picture of the next step.

Then I cut this into 1 1/4" sections and laid them out like this.
This block is the same technique as I-3 which is a 9-patch with different measurements.
I sewed all these together and got this.
No matter how carefully I sew, I end up with irregular 3/4" strips.
I do pin when I am connecting these rows
This time I sewed 1" strips around the outside to frame it.


And trimmed to a 5" square.


Remember that my intent here is not to write a full tutorial for every block for the whole quilt. You can find this block at that quilt.
I am posting how I am doing the blocks. When I get stuck and need some help, then I will go to thatquilt.blogspot and get some help. I had half of my first DJ blocks competed before I ever found it and was grateful that I did because that is where I discovered their reverse applique tutorials. Also, they did paper piecing by tracing the pattern from the DJ book onto freezer paper and give excellent directions to do it that way. This will be very handy for anyone who does not have the DJ software to print off paper piecing patterns like I did and will do again.

Blessings,
Chris